If you’re like me, and the one fishing outing you took in January was so cold and miserable that you uttered some semblance of, “I’m too old for this shit,” stowed your gear and waited for spring, now’s the time to pull it out of the closet and get it ready. Spring has sprung across many parts of the country, and it won’t be long until we’re itching to get out and enjoy some fishing with the sunshine on our backs and the fly rod guides free of ice. Having your gear ready to go when you hit the water is a nice way to start a new season.
And I’m not just talking about your fly rods here. There is a lot of cleanup and preparation that should be done before that first trip of the year — the whole idea is to ensure your equipment is functional and that you’re ready to make that first cast once you assemble your rod at the truck. Consider this a simple reminder. A checklist, if you will. It will help you make sure your fishing gear is ready when you are. And, honestly, even if you have a dozen fly rods in the rafters, much of the maintenance and preparation work can be done on the couch while you watch the craziest NCAA basketball tournament in memory. Just get the gear out and get it done.
Fly rods
This is the implement we count on the most. It’s also the tool that is most likely to have unnoticed damage from the year before. Pull it from its sock and carefully inspect each section, making sure to give the wraps and the guides special attention. Do you see any exposed thread? Any rust starting to show through on the stripping guide or the snake guides? Is the tip-top firmly attached and free of rust? Check the wraps on the female ferrules. Any splitting or cracking? Is the graphite or glass still intact?
Next, check the reel seat. Is it tight? If it's loose, it’s only a matter of time before it slides off the butt section. How about the threads? Free of dust or sand?
If you find an issue, now’s the time to send the rod in for repairs — before it fails on you on the water. If it’s solid and there are no problems, take a microfiber cloth or a chamois and carefully wipe the rod clean using a solution of warm water and a small amount of mild dish soap. Wipe each section down carefully, and don’t put the rod back in its tube or sock until it’s completely dry.
Fly reels
These are bit trickier. Really good reels are sturdy and dependable, but they’ll only stay that way if we take care of them. A lot of fly reels only need a simple inspection before we give them our seal of approval for another season of service. Others require a bit more effort, and that means taking them apart. If your favorite fly reel has a bearing assembly, remove the spool from the reel. You’ll be able to see discoloration or any dirt or grime in the center of the spool (and you might be surprised at how much there is). In most instances, you’ll need a Phillips screwdriver to separate the bearing assembly from the rest of the spool (if you fish with a sealed disc-drag reel, there really isn’t much you can or should do other than give the frame and spool a good wash in some warm, soapy water). Just be careful that you don’t lose any seals or screws when you do this — I recommend spreading them out on a table in front of you in the order the parts came off the spool. Then, wash each item in warm, soapy water. For your own sake, don’t do this in the sink. You drop one little piece down the drain, and you’re in big trouble.
For the spool, I use both a toothbrush to get at every nook and cranny, and then a cotton swab to clean up any excess grime. A chamois, microfiber cloth or even a paper towel can be used to dry everything off.
Now it’s time to lubricate the bearing assembly. Don’t use WD-40. It’s actually a solvent, not a lubricant, and it shouldn’t be sprayed on fly your reel. Instead use a silicon- or graphite-based lubricant that’s safe on plastic or rubber seals. I use CRC — a silicon-based lube that can be sprayed into the bowels of the bearing assembly. Dry off excess lube and reassemble your reel. Once you have it all put back together, turn the handle and work the lube throughout the assembly.
Yes, this can be a bit time-consuming, but if you perform this simple maintenance duty once a season, your reels will last years.
Fly lines
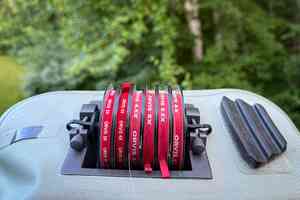
I’ve become a fly-line cleaning fanatic — it’s borderline OCD for me. Yes, I clean the line at the beginning of each season, both with a dunk in warm, soapy water, but also with an industry-crafted line-cleaning solution.
Most line makers recommend their own cleaning kits (some lines are even sold with them). I like the Line Speed kit from Loon Outdoors — it’s super easy, and supports my zealous line-cleaning habits quite nicely. I’ve been known to clean my lines daily during extended fishing trips, and, at the very least, I clean them before every outing. Lines aren’t cheap, and they’ll last several seasons if you take care of them. Cleaning lines also lets you find little nicks and cuts that sometimes don’t get noticed until you’re casting and you hear the imperfection as it catches on every snake guide on your fly rod on the way to the water.
Make the time to clean and inspect your fly line. You’ll save time and money if you do.
Leader and tippet
The first question you ask yourself is simple. “Do I have enough?” We’ve all reached for our tippet spools only to find that we’re down to about six inches of 3x, and we need another foot. Frustrating.
Unless you put a new leader on at the end of last season, I’d recommend replacing all of your leaders at the start of a new fishing year. There’s no sense rebuilding a leader that spent months wrapped around a fly reel developing a long-term memory and very likely growing a bit brittle. Just be smart and start fresh.
Vests, slings, packs
The soft goods we use to carry our gear can wear out, too. Check zippers and snaps, and pay special attention to the hook-and-loop (Velcro) connectors, as they will wear out first. They can be easily replaced, but it’s best to replace them before you lose your fly box full of Stimulators come stonefly season, or your box of freshly tied Clousers that you knew you had with you when you got on the boat but now can’t find for some reason.
My worst fastener failure? The hook-and-loop sling I used religiously for years gave out on my while fishing the Baja, and I ended up tossing a new DSLR camera into the surf. Had I checked, I’d likely still have a functional camera.
Make sure any D-rings or O-rings are in good shape, and that the plastic or steel hasn’t fatigued to the point of breaking. Check all your pockets to make sure they haven’t frayed or developed holes. Just give the item a thorough once-over. It’ll eliminate any surprises on your first day on the water.
Waders
If your breathable waders leak, you probably know it. But sometimes those leaks are so small that you literally can’t find them. It’s a simple fix, really. Fill a little spray bottle full of rubbing alcohol and turn your waders inside out. Spray the area where you think your waders are leaking. If there’s a hole, it will darken under the spray of alcohol. Mark it with a Sharpie, and when it’s dry, apply a dollop of Aquaseal on the marked spot. Push it into the fabric. Let it dry, and you’re good.
Don’t be surprised to find more than one small “pin-prick” hole in even the toughest pair of waders. A season spent bushwhacking through the willows or even just walking a trail can take its toll.
Wading boots
A simple look at your boots will tell you everything you need to know about them. Make sure the sole isn’t separating, and if you wade with felt-soled boots, make sure your felt isn’t wearing thin. If you’re missing studs on the soles consider ordering a new set from your bootmaker, or these low-cost alternatives as replacements.
Check the no-brainer stuff, too — the lace eyes and the laces themselves. Frayed or worn? Just get new laces.
Final word
This all seems elementary, but we’ve likely all been caught off guard thanks to gear failure that, had we taken the time, could have been avoided. Make it a point this season to clean and inspect the gear that makes our fishing possible. You’ll learn a lot about your gear and you’ll know when it’s time to send something in for repairs or simply replace something altogether. And it’s best done now, before you’re on the water and something unfortunate happens.


Comments