
With the cold season upon us and COVID cases soaring all over the country, it’s likely we’ll all be spending more time inside our homes over the next few months. The question is: what do you plan to do with that time? If you’ve been contemplating learning to tie your own flies, you’ve likely wondered where to begin. As an instructor for Penn State University’s Angling Program, one of my jobs is introducing fly tying techniques, tools and materials to students each semester. While teaching, I compiled this short list of tips that I hope will help get you started.
Fly Tying Economics
It’s important to mention right out of the gate that it’s highly unlikely that tying flies will save you money. In fact, I’ll go on the record and say that you’ll likely spend more money tying your own flies than you would if you purchased them. For many, fly tying quickly becomes an addiction. Whether one finds themselves shopping for new materials while watching a video on how to tie the latest “hot” pattern on YouTube, or obsessed with experimenting and designing new patterns, it’s almost guaranteed that you’ll end up spending more to tie your own flies.
But guess what? There is a long list of reasons to tie flies outside of saving money—there’s something undeniably special about catching fish on flies you’ve tied; it’s an enjoyable, creative activity that keeps you connected to the sport when you’re not able to fish; and it’s an excellent way to learn about entomology.
Essential Fly Tying Tools
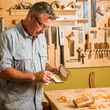
Premium quality tools are not essential for tying flies, but quality tools last longer and are generally more user friendly. The good news is, these days you can get a fly tying starter kit with quality tools for less than $150, like the Orvis Premium Fly Tying kit pictured above. Compared to any number of other hobbies, you don’t have to break the bank when to purchase quality fly tying tools and materials.
A quality kit should include the following tools: a vise, bobbin, bobbin threader, scissors, hackle pliers, bodkin, and finishing knot tool. In time, you will add or subtract from this list of core tools based on your needs and preferences.
Regarding fly tying vises—you’ll want to spend a bit of time considering whether a pedestal or clamp base is best for your tying area. Clamps are sturdy and limit wobble while tying. But, you’ll need a thin enough table base to secure the vise and you likely won’t want to clamp a vise onto your beautiful dining room table. Pedestal bases can be placed on any flat surface and are easy to travel with, but are not as sturdy as a clamp-based model. Do some research, think about where you’ll tie flies, and decide which setup is best.
When you’re able to, it’s always good to get first-hand experience with tools before you buy. Don’t hesitate to reach out to your local fly shop to see what options they have available at their location. Even with the ongoing pandemic, ask for a virtual demonstration via Zoom, FaceTime or similar from the comforts of your home. A good shop will happily provide this service and will have staff members who are well versed in all the tools they carry. In areas where in-person shopping is available and safe, you can head into the store, as most fly shops will have samples of each tool that you can physically touch and practice with. As is true of most tools, options abound. For example, some tiers prefer full rotary tying vises while others prefer fixed jaw. You may not know or understand what either “full rotary” or “fixed jaw” means now, but you will after speaking with your local shop.
Materials
It may sound easier to buy a tying kit that contains both tools and materials, but proceed with caution. Most “all-in-one” kits tend to contain poor quality materials, and may stick you with materials that aren’t appropriate for tying flies you need on your home waters. There are a few exceptions to the rule—like the aforementioned Orvis kit—but unless you’re certain of the quality, it’s best to steer clear.
Instead, start simple and call your local shop or a shop near the place you intend to fish. Explain to them you’re a beginner fly tier that is interested in procuring some starter materials and would like their advice on 3-6 patterns to start with. You’ll get quality products geared towards tying proven patterns for the waters you intend to fish.
To keep your material list simple and economical, ask the shop to keep the hook size and thread diameter/color the same for all the patterns they recommend. This way you’re not buying six different packs of hooks and six different diameters/colors of thread for those 6 patterns. The first 3 patterns my Penn State students tie are all on a size #12 hook with 6/0 black thread. The green weenie, Walt’s worm, and hare’s ear nymph are the first three nymphs patterns we tie and the retail cost for the materials needed to tie approximately 50 flies (a combo of the three patterns, not 50 of each) is less than $30. Keep it simple at first. Focus on developing good technique and then you can begin experimenting with other patterns and materials.
What to tie
Start with larger patterns. Dexterity and good tying technique is a skill developed over time. The biggest mistake I made with my first tying class was having beginners tie small patterns. This led to frustration which then led to a poor learning experience. Now, we start tying with larger patterns like a #10 or #12, then eventually work our way down to smaller patterns like an #18. Develop good dexterity and technique first, and you’ll work your way to smaller patterns with less frustration.
What else?
Here’s one last tip—buy razor blades to strip your unwanted flies of materials and save the hooks. Chances are, your first tying attempts will not yield masterpieces. Use a razor blade to strip the hook of all materials and start from scratch until you have a finished product you’re satisfied with. You’ll see improvements with your tying skills after several weeks and will likely want to discard your first attempts, so use a razor blade to reuse the hooks of any unwanted patterns. I also keep a small plastic container in my fishing pack to place patterns that are well used or falling apart. I then take this “recycling” bin back home and use a razor blade to strip the hook to be used another day.
Even if you’re not a hardcore fly fisher, tying flies is therapeutic, relaxing and is a fun way to spend time inside. And if you decide fly tying is not for you (after purchasing essential tools and materials) there are many great organizations to donate your tying tools and materials to. Groups serving youth programs, individuals dealing with cancer, and countless veteran organizations are always looking for donations so they can better serve those in need.
Oh, and if you're able, please support your local fly shop as you start your fly tying adventures. Happy tying and happy holidays!

.")


.")


.")
.")
.")
.")


.")


.")
.")

Comments
Glenn Dotter replied on Permalink
A really good article. Been tying for 40 years. Started with the basics. A Thompson A vice. Learned to the hares ear, pheasant tail, Adam's, and grey hackle yellow. A long time ago. But now those basics have paid dividends. An hour at my bench takes me away from all else.
It is a wonderful pastime!
Mike O’Mara replied on Permalink
Good tips. Regarding vises, I’ve always preferred clamp vs pedestal for reasons you mentioned, plus being adjustable as far as height. My solution to worrying about table thickness or marring a nice table is that I use wood kitchen cutting board and let it overhang the tying table by a couple inches for the clamp. It stays very well and doesn’t slide, and becomes a mini bench that you can lift and move with many items on it if you need to.
barry gibson replied on Permalink
Read books then read some more ! A good library goes a long way to good fly tying
James Heimer replied on Permalink
Don't forget that there is probably a fly fishing club near you. I live in Houston, TX, probably not the fly fishing capital of the world. After I had been here a few years, a friend that I scuba dive with mentioned he was also a fly fisherman, and that there was a local fly fishing club. Who knew? Anyway, I bet that your club has fly tying courses targeted at various levels of experience. And mine provided all the needed tools and materials to use during the course. You get hands on experience with instruction and a chance to try out the gear. Absent a club, check out your local fly fishing store. The ones in my area have fly tying nights in the store, and you can't go wrong developing a relationship with the experienced people who work there.
Pages